
Below, we walk through the complete process, explain each field and address common questions about the account holder, currency and reusing bank details.
Watch the step-by-step walkthrough for adding bank details in App Store Connect on our YouTube channel.
What Must Be Set Up Before Adding a Bank Account
The banking section is located in the Business tab. To receive revenue from paid apps, subscriptions and in-app purchases, the Paid Apps Agreement must be signed and in an active status.
Only the Account Holder can sign the agreement. Bank details are accessible to the Account Holder, Admin and Finance roles, but changes made by an Admin or Finance user may require confirmation from the Account Holder.
You must also complete any tax forms required for your legal entity and region. Adding a bank account alone does not trigger payouts — agreements, tax forms and a compliance review are all taken into account.
Before you begin, open your bank statement or official account details. You will need the account holder's name and address, the account number, the primary currency, the local routing or clearing code, and the IBAN if applicable. The set of fields depends on the bank's country. Do not fill in the form from memory.
Must the Bank Details Match the Apple Developer Account Holder
The Account Holder Name field does not have to match the legal entity name in the agreement exactly, but it must correspond precisely to the name recorded at the bank. For a joint account, Apple asks you to list both account holders.
Apple separately states that the account number must belong to an individual or legal entity enrolled in the Apple Developer Program. For this reason, the idea that any third-party account may be used cannot be considered correct.
For an Individual account, use the account of the enrolled program member; for a Company account, use the account of the legal entity enrolled in the program. In the Account Holder Type field, select Individual or Corporation according to the actual type of bank account owner. During a compliance review, Apple may request the Account Holder's identity document or the company's registration documents.
Which Bank Account Is Suitable for Apple Payouts
The account must accept electronic payments in the selected currency. You must enter the details of your own bank, not an intermediary or correspondent bank. If Apple or its banking partner requires additional information or documents, a separate request will be sent.
In App Store Connect you select the primary currency of the account — the currency in which the bank holds the balance and accepts deposits. Do not automatically select USD if the account does not support dollar-denominated inflows. Apple converts revenue from different regions into the currency of the primary account, and the result may differ due to exchange rates, taxes and banking fees.
Step 1. Open the Business Section and Bank Accounts
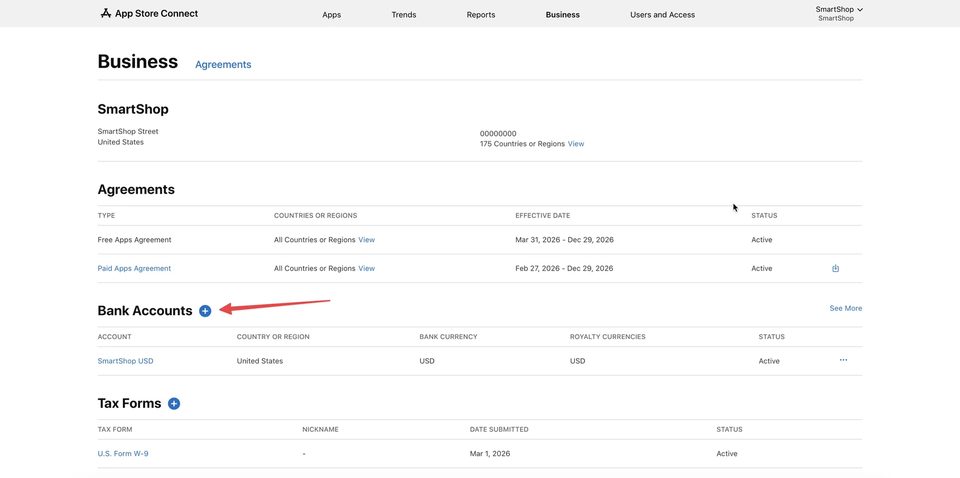
Sign in to App Store Connect with a user who has the appropriate role, open Business, and in the Agreements tab locate the Bank Accounts block.
Click the blue plus button next to the section heading.
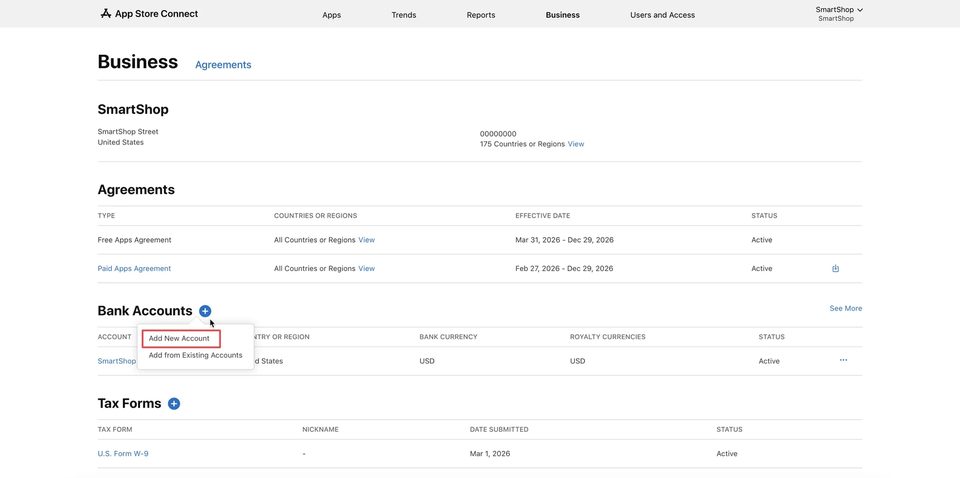
If a bank account has already been added, a menu will appear. To enter new details, select Add New Account. The Add from Existing Accounts option lets you choose a previously saved account.
Step 2. Select the Bank Account Country
In the Bank Country or Region field, enter the country of the bank branch that services the account. This is not your current location, not the geographic region of the Apple Developer account, and not necessarily the country of the banking group's head office.
The set of subsequent fields depends on the country you select. In the example of a US account, the system requests an ABA Routing Number and an Account Number. For other countries, a different routing or clearing code, IBAN and additional required fields may appear. In the US form, ABA and routing number are not two separate details — they are a single field called ABA Routing Number.
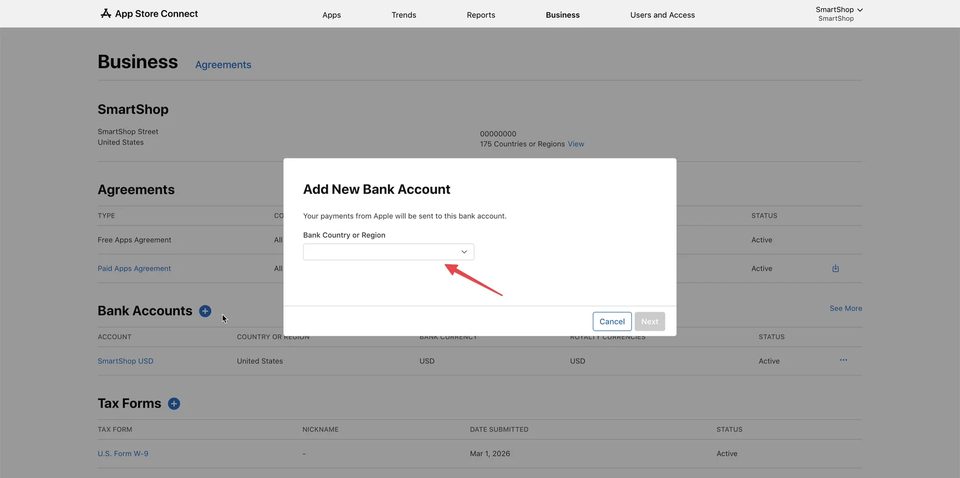
After selecting the country, click Next.
Step 3. Enter the Account Holder Details
Enter the details exactly as they appear in the bank's records:
- Account Holder Name — the individual's name or the company name;
- Account Holder Type — Individual or Corporation;
- Account Holder Address — the holder's address as registered with the bank;
- City, State or Province, Postal Code;
- Country or Region.
The Same as Legal Entity option is appropriate only when the bank account holder and the legal entity details genuinely match. Do not tick this box purely for the convenience of auto-filling the form.
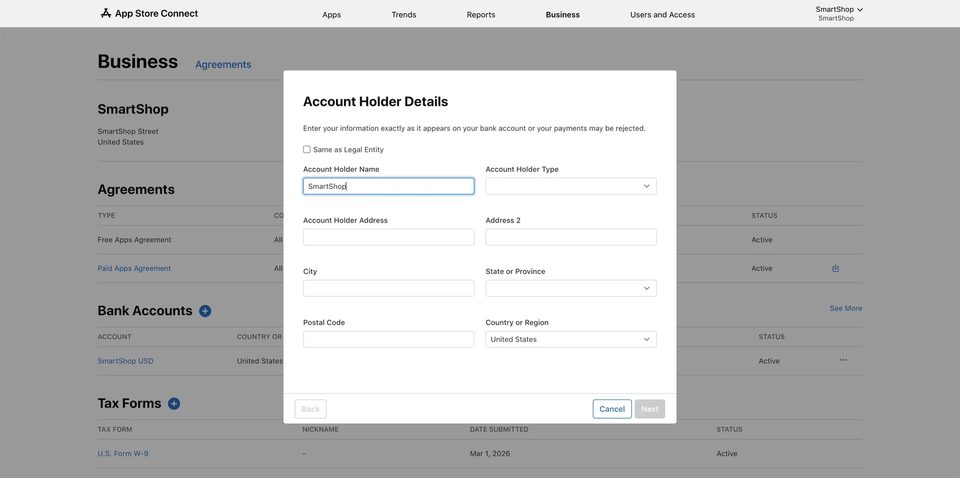
For a corporate account, use the legal name rather than a brand name or the name of an app. For a personal account, preserve the name spelling exactly as the bank has it on file.
Step 4. Enter the Bank Account Details
On the next screen, select or enter:
- Bank Account Currency — the account's primary currency;
- Account Type — Checking or Savings, if those options are available for the region;
- Account Name — an optional internal label by which you will recognise the account in App Store Connect;
- Account Number — the bank account number;
- the local routing or clearing code — for example, the ABA Routing Number for a US bank;
- IBAN, if applicable for the selected country;
- any other required fields that App Store Connect displays for the region.
The Account Name field is an internal label only, not the account holder's name.
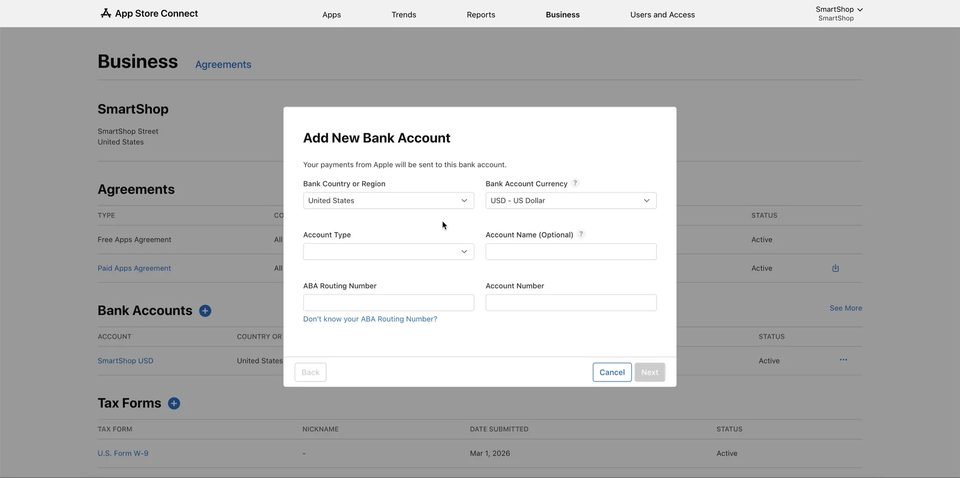
Preserve any leading zeros in the account number and routing number. Do not confuse the IBAN with an ordinary account number: if the system shows both fields, enter a separate value in each one.
Step 5. Locate the Correct Bank or Branch
After you enter the ABA Routing Number or another local bank code, App Store Connect may identify the bank automatically. If multiple matches are found, you will be prompted to select the correct one.
Verify the routing number first, then the bank name and address. Not every branch is listed in App Store Connect, so the bank code remains the decisive identifier.
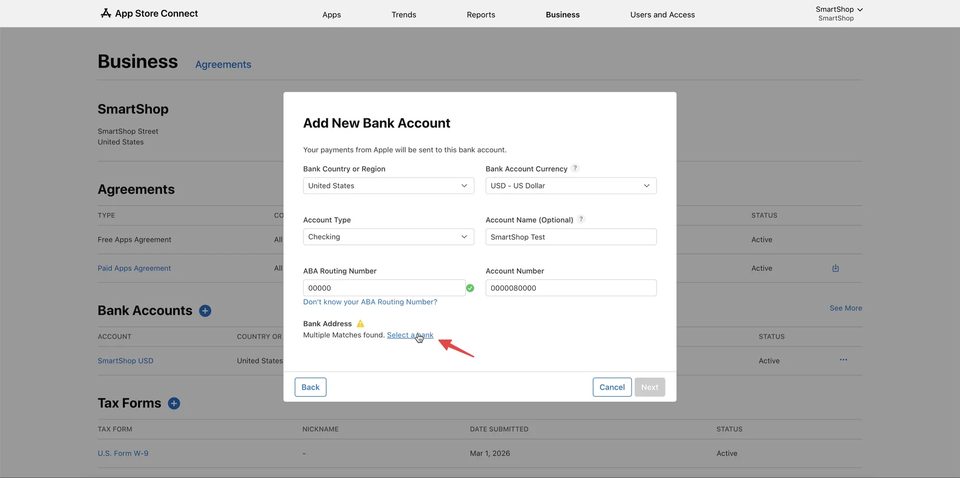
Do not pick the first result at random. If in doubt, ask your bank for the details intended for electronic inbound payments and confirm the correct routing or clearing code.
Step 6. Review the Final Details
After selecting the bank, the system will display its address and the completed account parameters. Compare the country, currency, account type, routing number, account number and bank name against the original document.
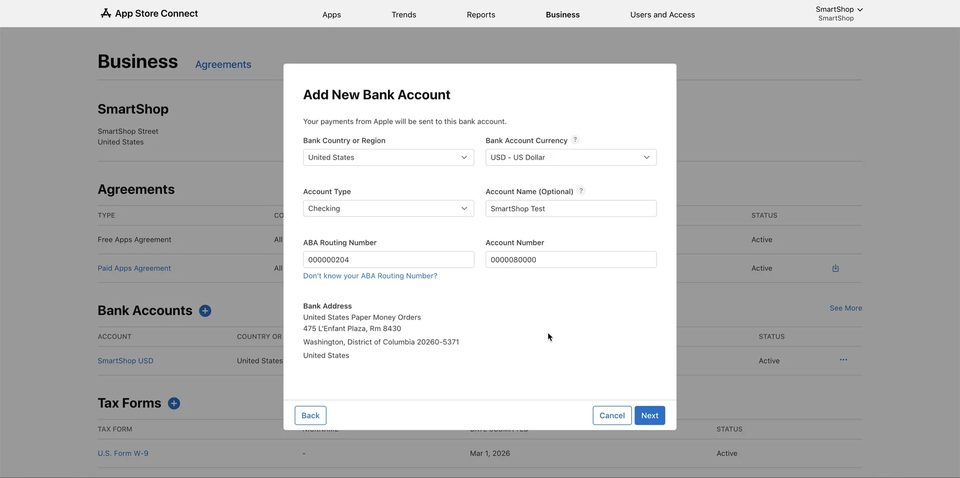
Pay particular attention to the Account Number: a value that is technically plausible but incorrect may pass the initial validation and result in a returned payment.
Step 7. Confirm the Certification
On the final screen, App Store Connect will show the certification text. Tick the checkbox confirming that you have read and agree to the terms, then click Add.
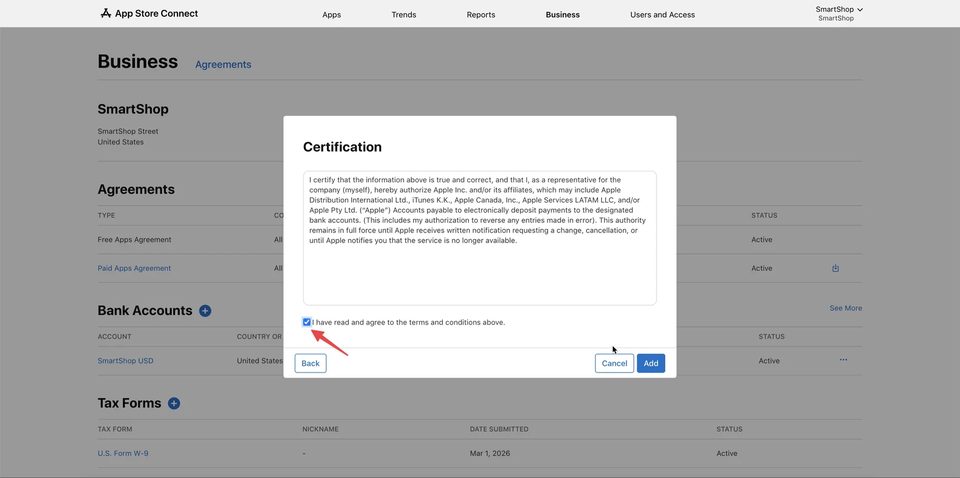
This step should be completed by a user who is authorised to confirm financial information for the account.
Step 8. Confirm the Account Appears in Bank Accounts
After submitting, return to the Bank Accounts block. The new account should appear in the list. Check its name, country, currency and status.
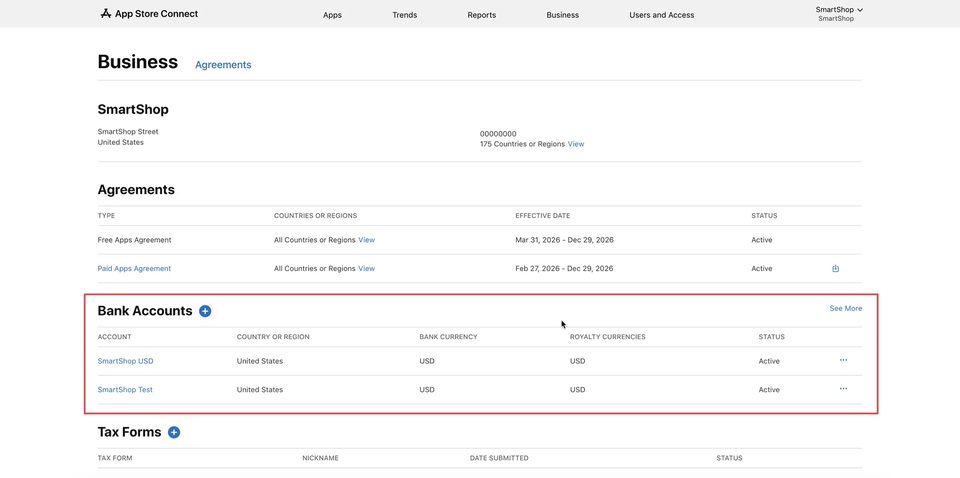
Multiple bank accounts can be stored in the list, but Apple sends payouts to only one primary account selected for current payments. Splitting a single payout across multiple banks is not supported.
How Quickly Is a Bank Account Activated
In the example shown, the US account appeared in Bank Accounts with an Active status immediately after being added. This is possible when no separate confirmation or compliance review is required. Apple does not specify a mandatory waiting period for every new account.
The up-to-24-hour timeframe applies to a different situation: if the new account was added by an Admin or Finance user, the Account Holder must confirm the change. After confirmation, Apple processes it within 24 hours. If the Account Holder declines or does not confirm within 30 days, the bank details will not be updated.
A separate bank account compliance review may also be conducted. In that case, Apple requests the Account Holder's identity document for an Individual account, or registration documents for a Company account. If the review remains incomplete for more than 14 business days, Apple recommends contacting support.
All required tax forms must be submitted before Apple can process the banking information. However, official documentation does not state that previously completed tax forms themselves speed up bank activation.
Can One Bank Account Be Used for Multiple Apple Developer Accounts
Apple's public documentation does not establish a specific permission, prohibition or numerical limit for linking one external bank account to multiple independent Apple Developer accounts. It is therefore not possible to confirm a universal "safe threshold."
At the same time, the basic Apple requirement applies to each addition: the account number must belong to an individual or legal entity enrolled in the relevant Apple Developer Program. Reusing the same bank details is appropriate only when this requirement is met for each account and ownership of the account can be verified with documentation.
Common Mistakes When Setting Up Payouts
In practice, issues most often arise not from a complex form but from inattentiveness:
- The developer's country of registration is selected instead of the bank branch country.
- A currency is selected that the bank account does not support.
- The account holder name does not match the bank's record.
- Leading zeros in the Account Number are omitted.
- The IBAN is entered in the ordinary account number field.
- Intermediary or correspondent bank details are provided.
- After a search, a bank with an incorrect routing or clearing code is selected.
- The Paid Apps Agreement has not been signed.
- Required tax forms have not been submitted.
- A change made by an Admin or Finance user has not been confirmed by the Account Holder.
Before saving, verify every field against the bank statement. Do not share full bank details in public chats. If the purpose of an IBAN, routing number or other code is unclear, ask your bank.
When Payouts Will Begin
An active bank account does not mean an immediate payout. The Paid Apps Agreement and tax forms must also be active, and the accumulated amount must exceed the minimum threshold.
Once all conditions are met, Apple transfers funds within 45 days after the end of the financial month in which the transactions were completed. You can track the status, expected date and final amount in the Reports — Payments and Financial Reports section.
If a payment has already been initiated, a late change to the bank account may only take effect from the next payment cycle. It is therefore better to configure bank details before monetisation launches, rather than after the first significant revenue appears.
Conclusion
To correctly add bank details to an Apple Developer account, you must sequentially verify the paid agreement, tax forms, user permissions and the bank details themselves. The core principle is to transfer information from official bank documents without abbreviation, guesswork or arbitrary changes to the currency or country.
After submitting, confirm that the account appears in Bank Accounts and check its status. Correct bank details reduce the risk of returned payments and delays in receiving App Store revenue.
Individual $350 · Company $650 · Renewal $200. We supply Web Made and Device Made accounts. Get in touch — we'll find the right option for you.
Message us on Telegram