
Publishing an app on the App Store is only one part of the process. If a developer plans to sell a paid app, offer subscriptions or in-app purchases, and receive payments from Apple, the commercial side of the account must also be configured in App Store Connect.
This is usually where questions arise: Why is the agreement inactive? Which tax form should be selected? How is an EIN different from an SSN? What does Individual/Sole proprietor mean? Can submitted information be corrected later? Below, we will walk through the full process using the example of an individual Apple Developer account holder who is a U.S. person for tax purposes and uses their own EIN.
This is not a universal tax guide. The required form and fields depend on the country, account ownership type, and tax status. The process may be different for a Company account, a non-U.S. individual, or a legal entity.
Why Apple Requires Agreements and Tax Information
A free app can be distributed under the standard Apple Developer Program agreement. However, selling a paid app or digital content through In-App Purchase requires a separate commercial agreement: the Paid Apps Agreement.
This agreement governs the sale of apps, subscriptions, and in-app purchases, as well as commission calculations, financial reporting, and the transfer of proceeds to the developer. After the agreement is accepted, Apple requests additional information:
- account holder details;
- tax information;
- banking details for payments;
- additional documents when required for a specific country or region.
Tax Forms are not required for App Review or for uploading a build to TestFlight. They relate to monetization and financial settlements. Until the commercial setup is complete, the Paid Apps Agreement may remain in a status that requires action, and payments will not be available.
Who This Guide Is For
The scenario described in this article applies to an account that:
- is enrolled as Individual;
- belongs to a U.S. person for tax purposes;
- is operated by an individual or sole proprietor;
- is completing U.S. Form W-9;
- uses the account holder's own valid EIN.
Form W-9 is intended for U.S. persons. If the account holder is located outside the United States, App Store Connect may offer W-8BEN, W-8BEN-E, W-8ECI, or another form depending on the answers provided and the ownership structure.
You should not select W-9 simply because payments are connected to a U.S. company. The determining factor is the tax status of the income recipient, not Apple's location.
What to Prepare Before You Begin
Before opening the Business section, it is a good idea to verify the information that will be used in the form:
- The account holder's full legal name.
- The address associated with the tax records.
- The tax classification.
- A valid SSN or EIN.
- Access to two-factor authentication for the Apple Account.
- The correct user permissions in App Store Connect.
Only the Account Holder can accept the Paid Apps Agreement. Tax information can generally be added by users with the Account Holder, Admin, or Finance role, although the exact actions available depend on the role and the current agreement status.
The name and tax identification number must belong to the same taxpayer. Even a technically valid nine-digit number may fail verification if it does not match the account holder's name in the tax authority's records.
Step 1. Accept the Paid Apps Agreement
In App Store Connect, open Business, then go to the Agreements tab. Find the Paid Apps row and select the option to review and accept the terms.
Before confirming, check:
- the name of the individual or legal entity;
- the account holder's address;
- whether the agreement version is current;
- whether any incomplete-action warnings are displayed.
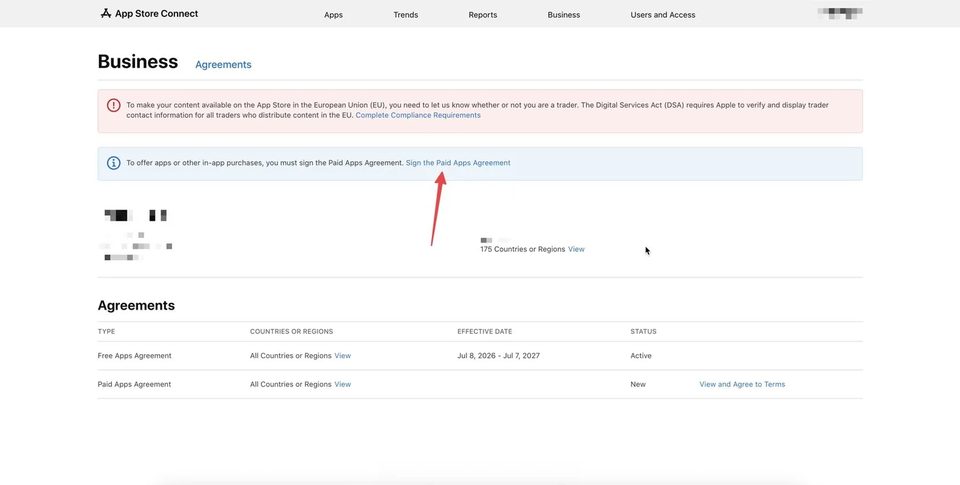
On the Business → Agreements page, click Sign the Paid Apps Agreement or the View and Agree to Terms link in the Paid Apps Agreement row.
In the agreement modal, review the terms, check I have read and agree to the terms and conditions above, and wait for the Agree button to become active. Then confirm the agreement.
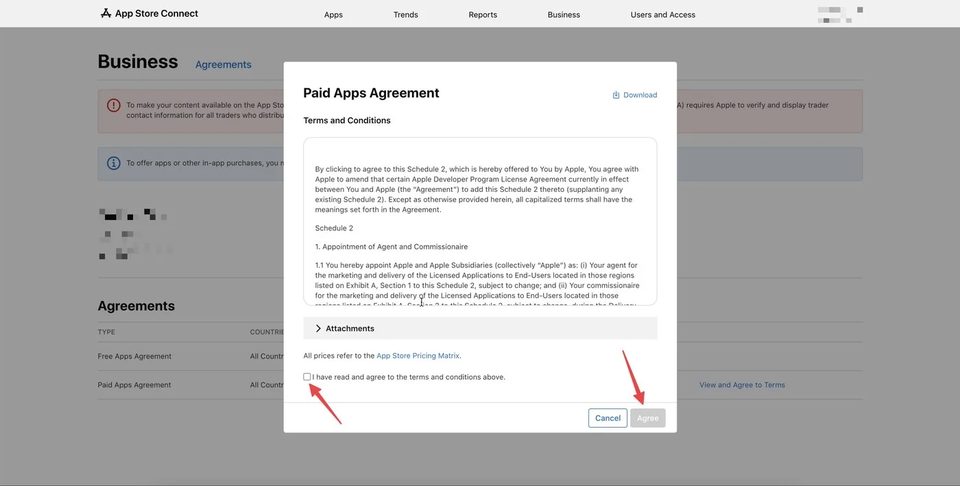
Apple may request a two-factor authentication code. An accepted agreement cannot simply be reversed with a single button, so this action should be completed by the account owner or an authorized Account Holder.
If Apple releases a new version of the Paid Apps Agreement, it must also be accepted. An outdated agreement can restrict the creation of a new paid app or In-App Purchase, even if tax and banking details were previously added.
Step 2. Open Tax Information
After accepting the agreement, return to Business → Agreements. The Paid Apps Agreement should now display the Pending User Info status. This means the agreement has been signed, but tax and banking information are still required to complete the commercial setup.
Further down the page, find the Tax Forms section. Next to U.S. Form W-9, you should see the Missing Tax Info status and an Add Tax Info button. Click it to open the tax form.
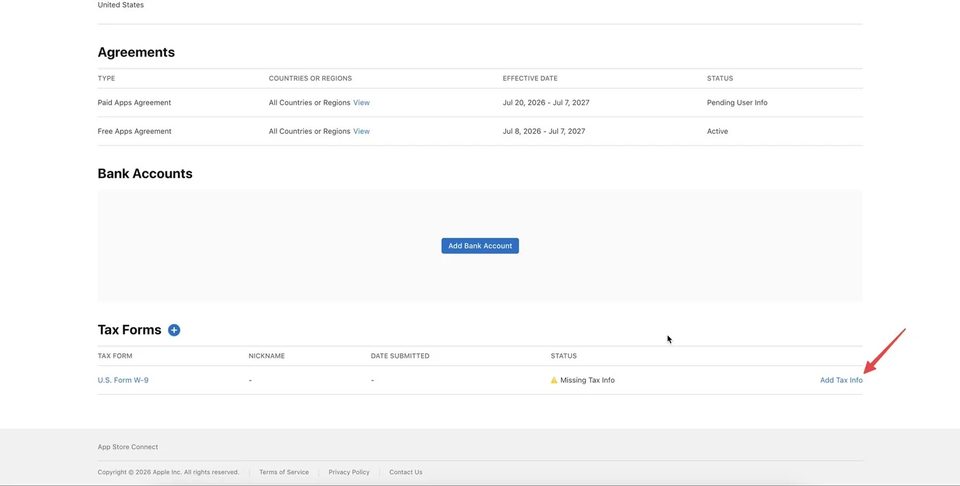
For the U.S. individual account holder in this example, U.S. Form W-9 is opened.
If the form does not appear automatically, the interface may provide an option to add a tax form. Do not select a form at random. App Store Connect presents options based on the account country and the information already provided.
Step 3. Select Individual/Sole Proprietor
For the scenario covered in this guide, select the following option in the Type of Beneficial Owner field:
Individual/Sole proprietor
This option covers two closely related cases:
- an individual receiving income in their own name;
- a sole proprietor operating a business without a separate corporate entity for the purposes of this tax classification.
A sole proprietor should not automatically be treated as a Company account in the Apple Developer Program. Apple Developer membership type and federal tax classification are related, but they are not the same thing.
If the account belongs to an LLC, corporation, partnership, trust, or another structure, selecting Individual/Sole proprietor may be incorrect. In that case, rely on the actual formation and tax documents, and consult a tax professional if necessary.
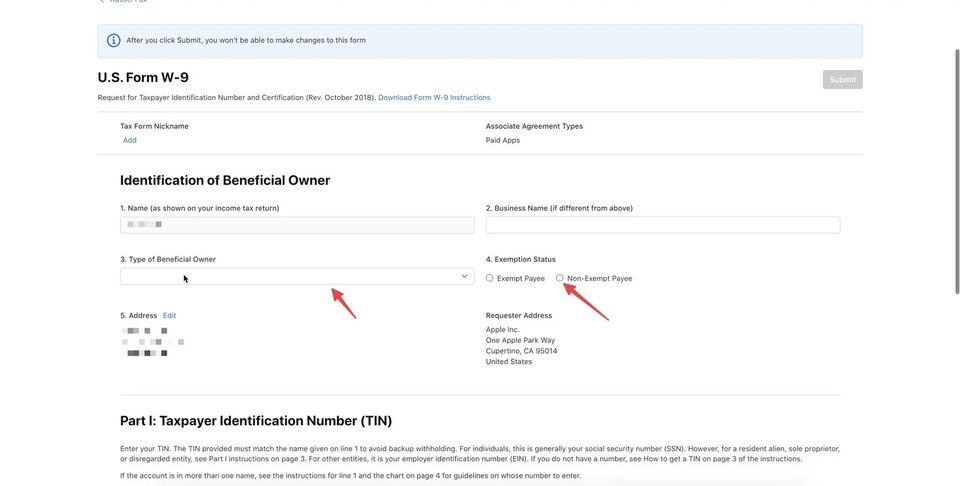
The screenshot below shows the location of the Type of Beneficial Owner field. The Exemption Status section is visible on the right side of the same screen and is covered in the next step.
Step 4. Understand Exemption Status
For a standard individual account holder in this example, select the following option on the right side of the form:
Non-Exempt Payee
This is the option highlighted in the screenshot above. It means the recipient is not claiming a special exemption from backup withholding. Under the general rules of Form W-9, individuals and sole proprietors are usually not treated as exempt payees.
However, Non-Exempt Payee does not mean Apple will automatically withhold tax from every payment. Backup withholding applies only under certain conditions, such as an incorrect TIN or a relevant notice from the tax authority.
Do not select exempt status simply to reduce withholding. Any exemption must be supported by the taxpayer's actual category and the applicable rules.
Step 5. Enter a Valid EIN
EIN stands for Employer Identification Number, a federal identification number issued by the IRS. It contains nine digits and is usually written in the following format:
XX-XXXXXXX
In App Store Connect, the hyphen may be added automatically, or the field may accept digits only. Follow the format shown in the specific field.
In Part I: Taxpayer Identification Number (TIN), enter your own tax number and select EIN. If your case requires an SSN, select SSN instead of copying the example.
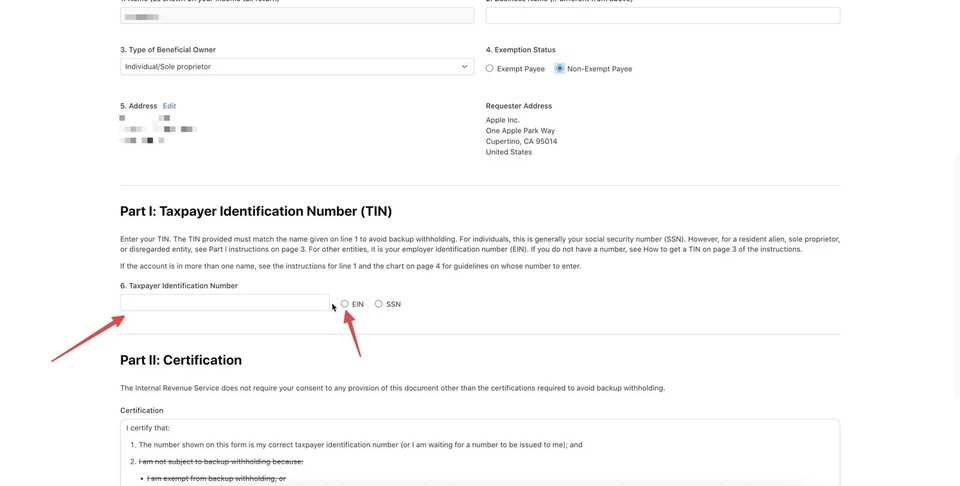
Under certain conditions, a sole proprietor completing Form W-9 may use an SSN or EIN. In this example, the account holder's own EIN is used. Do not enter:
- another person's or company's EIN;
- the account's seller number;
- a D-U-N-S Number;
- a bank routing number;
- a randomly generated nine-digit number;
- an ITIN or SSN in the EIN field without understanding the purpose of the field.
The key check is whether the name and TIN match. If the EIN is registered under a different name, the account holder's name is spelled differently, or another business structure's details are used, the form may require additional review or correction.
Step 6. Verify the Name, Address, and Certification
Before submitting the form, compare all entered information with the supporting documents:
- the name must appear in the correct order and spelling;
- a business name should be added only when applicable and in the correct field;
- the address must be current;
- the tax classification must match the account holder;
- the EIN must contain nine digits;
- there should be no extra spaces, typing errors, or substituted characters.
At the bottom of the form, in Part II: Certification, check:
Under penalties of perjury, I certify the statements above.
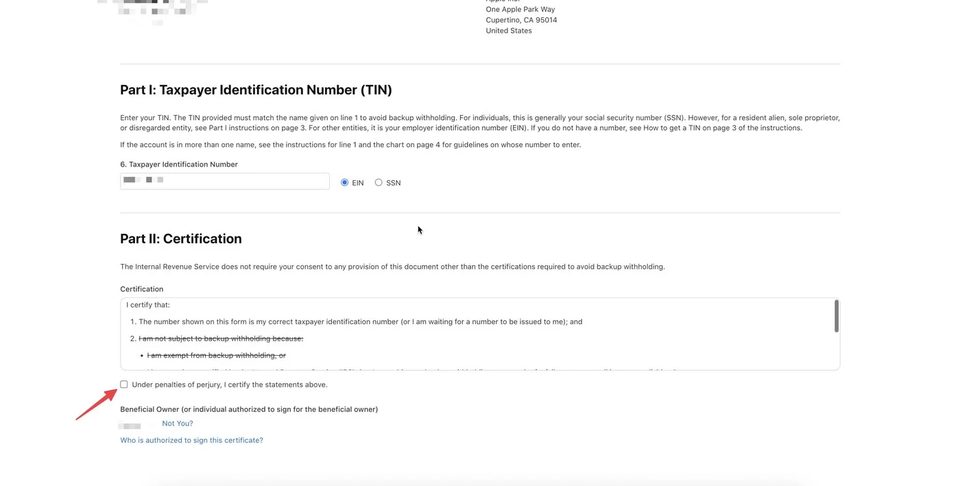
This is not a standard acceptance of user terms. By checking the box, the account holder certifies that the tax number, status, and other statements in the form are accurate. Test, temporary, or third-party information must not be used.
After the final review, return to the top of the form and click Submit in the upper-right corner. The interface explicitly warns that the form cannot be changed after submission.
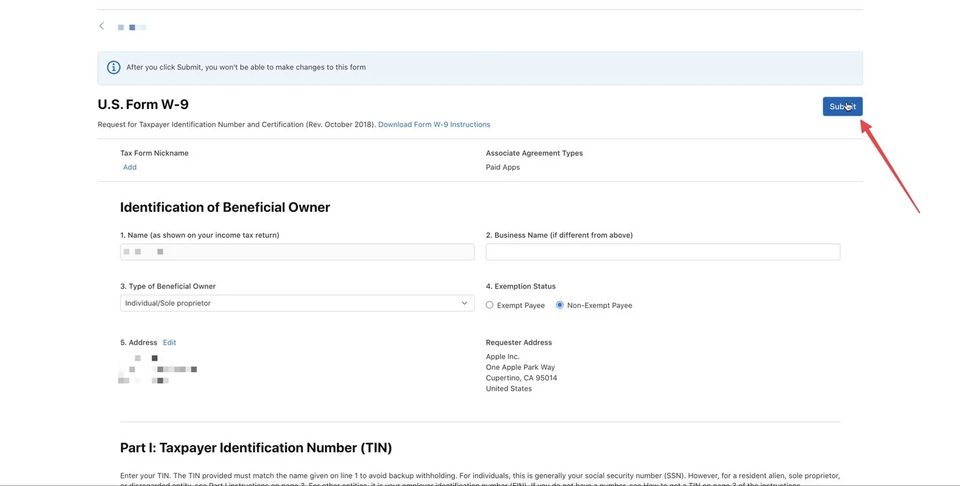
What to Check After Submission
Return to Business → Agreements and review the status of the tax form and the Paid Apps Agreement. Look for the following possible states:
- the form has been accepted and no further action is required;
- the information is being processed;
- a request for additional information is displayed;
- the agreement is signed but remains in
Pending User Info; - banking details have not yet been added or verified.
The tax form alone does not complete the payment setup. To receive proceeds, you also need an active Paid Apps Agreement and valid banking information. Payments are also issued only after the minimum threshold is reached and the relevant Apple financial period has closed.
Do not resubmit the form simply because the status does not update immediately. First check App Store Connect notifications and the Account Holder's email.
Common W-9 Mistakes in App Store Connect
Opening Tax Forms Before Accepting the Agreement
Apple displays the tax forms after the Paid Apps Agreement has been signed. The correct order is: agreement first, then Tax Information and banking details.
Selecting W-9 for a Non-U.S. Account Holder
Form W-9 is used by U.S. persons. For an account holder outside the United States, the system will usually offer one of the W-8 forms. Selecting the wrong form changes not only the interface, but also the meaning of the tax certification.
Confusing an Individual Account With Tax Classification
An Individual membership does not remove the need to verify the actual tax status. For example, a separate LLC or another entity may require a different classification.
Entering an EIN That Does Not Match the Name
A nine-digit format is only a technical requirement. The number must actually belong to the taxpayer named in the form.
Selecting Exempt Payee Without a Valid Basis
For a typical individual or sole proprietor, Non-Exempt Payee is more common. Exempt status should not be selected as a matter of preference.
Submitting the Form Without a Final Review
After submission, changing tax information may require contacting Apple Developer Support. Correcting an error often takes more time than verifying the name, address, and TIN before submission.
What Company Accounts and Non-U.S. Account Holders Should Do
For a Company account, the required fields depend on the company's legal form and tax classification. Use the details of the exact legal entity under which the membership is registered and which receives the proceeds.
For account holders outside the United States, App Store Connect asks additional questions and directs the user to the appropriate form. An individual may need W-8BEN, a legal entity may need W-8BEN-E, and W-8ECI may apply in certain cases. Apple may also request a local tax number, VAT/GST registration, or supporting documents.
The main rule remains the same: the Apple Developer account information, tax form details, and bank account beneficiary information must not contradict one another.
Quick Checklist
Before completing the setup, make sure that:
- the Paid Apps Agreement has been accepted by the Account Holder;
- the selected form matches the country and tax status;
Individual/Sole proprietoris selected for the scenario covered in this guide;Non-Exempt Payeeis selected only when no exemption applies;- the account holder's own valid SSN or EIN is used;
- the EIN contains nine digits;
- the name and TIN match IRS records;
- the address and all other fields have been reviewed;
- the certification has been confirmed knowingly;
- the Tax Forms status has been checked after submission;
- banking details have been added and verified.
SmartShop Video Guide
You can watch the complete on-screen walkthrough of the Agreements and U.S. Form W-9 process on the SmartShop YouTube channel:
Full video guide: completing Agreements and U.S. Form W-9 in App Store Connect for an individual Apple Developer account.
Conclusion
Completing Tax Forms for an individual Apple Developer account is a straightforward process when the correct tax form has been identified in advance and all information is consistent. For a U.S. account holder operating as an individual or sole proprietor with their own EIN, the process generally includes accepting the Paid Apps Agreement, opening Form W-9, selecting Individual/Sole proprietor, choosing the appropriate exemption status, entering the tax identification number, and certifying that the information is accurate.
The main risk is not the App Store Connect interface itself, but an incorrect tax classification or a mismatch between the name and TIN. Before submitting the form, do not copy another person's example mechanically. Make sure every selected option applies to the actual account holder.
Individual $350 · Company $650 · Renewal $200. Web Made and Device Made available. Message us — we'll find the right option for you.
Message on Telegram